Tuesday, May 27, 2008

VLAN Trunk Protocol (VTP) Basics

VLAN Trunk Protocol, or VTP, helps us to keep the VLAN Database consistent between our network. Some peaple just love it, others not so much... I use VTP when needed... But with carefull, one simple mistake, and you can bring your entire network down! (well... not that dramatic, but you can have a BIG headache with it!).

So, what VTP can do for us?! Well... it "propagates" the VLANs created in one Switch in the domain (acting as server) to other switches in the same domain (either acting as server or client), VTP makes adding, deleting and distributing vlan database easy.

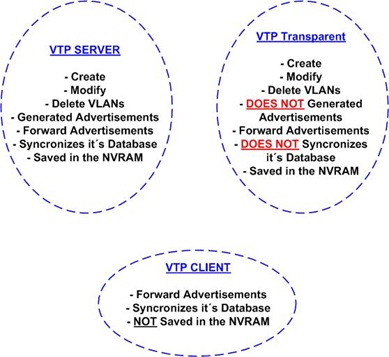
Lets step back a while... How many VTP Modes exists?! There are three in fact, Server, Client and Transparent:

VTP 1

All changes made in a Switch working in the VTP Transparent Mode are locally significant.

Some general rules about VTP:

- VTP packets are only carried on trunks in vlan 1;

- VTP domain name is case sensitive;

- VTP only ‘services’ vlan 1-1005;

- Switch needs to be in VTP transparent mode if extended range vlans (1006-4094) are to be used.

VTP keeps tracks about the changes by checking the revision number (the higher the revision number, the newer the database version).

So far it looks great, but let´s supose you have a network working with the VTP Domain Cisco with no password set, and a revision number 13 (the revision number increases by 1 each time you make any changes in the VLAN Database).

Good, also supose you have a LAB with some switches used for training purposes, like new engineers, and they spent all day long creating, adding, changing vlans on that switch, and off course, they´ll set the same VTP Domain as in your production network... Ok, no problem! The switch is not connected, is just a stand alone switch used for training your future co-worker friend! But what happen if  he wants to check his email and for instance, connect the switch to the production network?! Well! This is where the danger lives! The Revision Number is much higher than 13, so your production switches will replace their database by this new one from the LAB Switch! And that can crash a network in just a few seconds!!!

Ok... so... am I not suppose to use VTP to avoid this kind of problem?! Well... if you have just a few VLANs yes... but if we´re talking about 100, or even 200, 300 vlans?! You´re going to add it manually in each switch in the network?! If you have 5 switches, you´ll have a LOT of work!

Some basic rules must be followed to avoid this kind of problem:

- Set the VTP Domain and also set the VTP Password;

- Have only ONE VTP Server in the network and made the changes just in it;

- When you add a new switch to a production network, reset the revision number (every time you change the VTP Domain name, the revision number gets reseted to 0);

- Only connect a new switch in the mode client (with the revision number reseted).

Taking care about it will make your life easier, and will help you to keep your job! :)

Will post some examples output later in the week...
Thursday, May 15, 2008

Frame-Relay Inverse-Arp

Frame-Relay (a Layer 2 protocol) uses Inverse-Arp to map a know Layer 2 Address (DLCI) to a unknow Layer 3 Address (for example, IP).

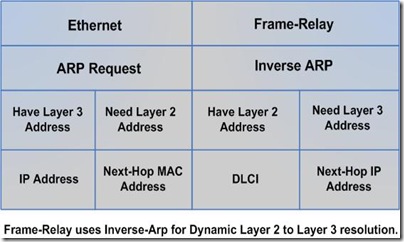
If we would ever compare Ethernet ARP Request, with Frame-Relay Inverse ARP, we would have the following:

FR2

As you can see, both of them perform pretty much the same thing, but Ethernet ARP Request knows the Layer 3 Address, and requests the Layer 2 Address (MAC), on the other hand Frame Relay Inverse ARP knows the Layer 2 Address (DLCI) and request the Layer 3 Address (Next-Hop IP Address).

Once the interface is enabled, the router will send Inverse-Arp requests out all DLCIs learned via LMI for all protocols configured on the interface.

You can rely on Inverse-Arp to map the DLCI to the IP Address of your Routers, or if you want (or the situation asks for), you can create static maps.

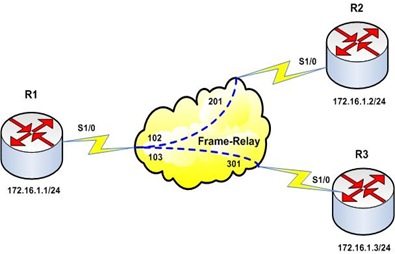
Check this example network:

FR

Router R1 will rely on Inverse-Arp to create it´s Frame-Relay Maps.

R2 and R3 will use Static Mapping, with Inverse-Arp disabled. The configuration will look like that:

R1:

interface Serial1/0
ip address 172.16.1.1 255.255.255.0
encapsulation frame-relay

R2:

interface Serial1/0
ip address 172.16.1.2 255.255.255.0
encapsulation frame-relay
frame-relay map ip 172.16.1.3 201
frame-relay map ip 172.16.1.1 201 broadcast
no frame-relay inverse arp

R3:

interface Serial1/0
ip address 172.16.1.3 255.255.255.0
encapsulation frame-relay
frame-relay map ip 172.16.1.1 301 broadcast
frame-relay map ip 172.16.1.2 301
no frame-relay inverse arp


Frame-Relay Inverse ARP is not required on point-to-point interface, and, if needed it can be disabled with the following command under the interface you need to do it:

no frame-relay inverse arp

However, Inverse ARP Reply can NOT be disabled, that means, even if you disable your Inverse ARP in an interface, if this interface receives any Inverse ARP Request it´ll respond to the request!

image

Tip: If you see mapping to 0.0.0.0 (show frame-relay map). Try “clear frame-relay inarp”. If it still doesn’t work, save config & reload.


We can check which type of mapping was configured with the command "show frame-relay map":

- dynamic means the mapping was done using Inverse-Arp;

- static means the mapping was done manually (by command-line-interface).

Just to prove that, check the status of our example Routers R1, R2 and R3 like that:

R1#sh frame-relay map
Serial1/0 (up): ip 172.16.1.3 dlci103(0x67,0x1870), dynamic,
              broadcast,, status defined, active
Serial1/0 (up): ip 172.16.1.2 dlci102(0x66,0x1860), dynamic,
              broadcast,, status defined, active

R2#sh frame-relay map
Serial1/0 (up): ip 172.16.1.3 dlci 201(0xC9,0x3090), static,
              CISCO, status defined, active
Serial1/0 (up): ip 172.16.1.1 dlci 201(0xC9,0x3090), static,
              broadcast, CISCO, status defined, active

R3#sh frame-relay map
Serial1/0 (up): ip 172.16.1.1 dlci 301(0x12D,0x48D0), static,
              broadcast, CISCO, status defined, active
Serial1/0 (up): ip 172.16.1.2 dlci 301(0x12D,0x48D0), static,
              CISCO, status defined, active


More info can be found at IEWB Vol.1 and also on Cisco´s Website under the following link:

http://www.cisco.com/en/US/tech/tk713/tk237/technologies_tech_note09186a008014f8a7.shtml

Not that difficult, right?! :)

Wednesday, May 14, 2008

Spanning-Tree (Sharing Traffic between Links)

Spanning-Tree help us to keep our networks loop free, and it does that without "almost" any kind of intervation. That´s so cool! You can just get your switch out of the box, install it, Spanning-Tree (at least on Cisco Switches) is enabled by default, so don´t worry about loops, you have other things in mind to be worried about (like IP Address, VLAN, VTP, etc).

By default Spanning-Tree will calculate the Best Path (that means the one with the lowest cost) to the Root, and if you have a second connection, with a higher cost to the root STP will block it! If it finds a tie between two paths, it´ll use other metrics (like first port, bridge id, etc).

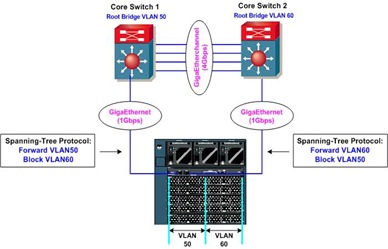
Ok, but in your case, you have TWO Core Switches, with all the same features, working togheter. In that case (and many others) you can split your switch in two different VLANs (X and Y for example), and make your Core Switch 1 the ROOT Bridge for VLAN X, and Core Switch 2 the ROOT Bridge for VLAN Y. Check the diagram below (it´s simple):

STP7

That way you can use both links, instead of having ALL the traffic in only one, and having the other link blocked by Spanning-Tree.

How can you do that?! Just use the command spanning-tree vlan <vlan number> priority <priority value> at the root, just keep in mind that the lower the Bridge Priority, the best chances it has to become the ROOT Bridge for that VLAN.

The default priority value is 32768. If you configure your network for, let say, to 24576, it´ll become the ROOT Bridge. And you can do that for each VLAN (or group of VLANs).

In this example, Core Switch 1 would have this command line:

spanning-tree vlan 50 priority 24576

And Core Switch 2 with this one:

spanning-tree vlan 60 priority 24576

With that you can make a better use of your connections! (again, that will depend on your topology, planning is ALWAYS a MUST before doing any intervation in your network!).

We can also use Routed Access to do that (share traffic between links), in a smarter way, but that is a discusion for later! :)

Tuesday, May 6, 2008

Money Spent (so far...) - Updated Jul/11/08

Here follows the investment made so far, I´ll keep it updated as I get more resources:

Developing IP Multicast Networks, Volume I USD 39.00
Internet Routing Architectures (2nd Edition) USD 36.00
OSPF and IS-IS: Choosing an IGP for Large-Scale Networks USD 32.99
Cisco Self-Study: Implementing Cisco IPv6 Networks USD 36.00
Routing TCP/IP, Volume I (2nd Edition) USD 51.00
Routing TCP/IP, Volume II USD 55.00
Troubleshooting IP Routing Protocols USD 39.00
Interdomain Multicast Routing: Practical Juniper Networks and Cisco Systems Solutions USD 29.99
CCIE R&S Advanced Technologies CoD          CCIE R&S Lab Workbook Volume I (Electronic) CCIE R&S Lab Workbook Volume II (Electronic) USD 895.00
CCIE Routing and Switching Practice Labs (Digital Short Cut) USD 51.99
IPExpert´s CCIE R&S Blended Learning Solutions USD 999.00
Shipping & Handling USD 59.70
TOTAL USD 2324.67

My Plan to CCIE - Part I (of many!) :)

Well... it´s true that I do not have all the time I want to study, and keep focusing on CCIE topics... (but... who does, right?!) and I´m felling kind "out-of-track" right now, but I´ll commit myself to a schedule and try to stick to it as much as I can, otherwise, CCIE will not be possible! I gotta start using any free hour I do have to get hands-on!

I´ll keep going through Doyle´s Book, while doing IEWB Vol. 1 and watching IEATC-RS-COD to get into the basics before proceeding to Full Scale Labs.

Right now I´m finishing the excellent Doyle´s OSPF and IS-IS: Choosing an IGP for Large-Scale Networks, IS-IS is not covered in the CCIE Lab, but OSPF is, and´they both have much in common.

So I´ll prepare a calendar with tasks, goals, and try to stick to it! This is the only way to make it happen!

Also, I saw many telling not to sticky to only one vendor, to avoid getting used to the way they ask you to do things. In a few months when I start my IEWB Vol. 2 I´ll look for that, right now, I´m in doubt between NMC DOiT Vol. 2 and Narbik Advanced CCIE Routing & Switching Workbook, I heard great things about both, and really liked the comments about Narbik´s Workbooks... BUT, on the other hand, I´ve heard about the challenge that NMC DOiT are... so... I´ll need to make a decision about that later on!

Maybe, and just maybe, I´ll be able to get both, but, right now I don´t believe so! One thing that may make my decision easier is that DOiT Vol. 2 is "downloadable"... Narbik Advanced CCIE Routing & Switching is not and that way it´ll go through customs, and I´ll have more, and more taxes to pay, so... I´ll think with care about that in a few months...

As you can see, I have much work to do!!!

Thursday, May 1, 2008

IOS Upgrade

It has been a while now that I don´t blog anything, well! I got some "hard days" at work (who doesn´t right?!) and it made my life a bit difficult, but now things are getting better, and I´ll try to spent more time on the blog!

Well... this week I got two calls at night requesting my assistance to help someone to "Download a new IOS into a Router"... ok, not a big deal, 10 minutes support will not hurt me! The engineer was doing "almost" everything right... except that he forgot to disable the Windows Firewall that was blocking the TFTP, easy...

1. Disable your Firewall, or permit the TFTP to work! TFTP uses TCP Port 69. Make sure your Firewall, either a third-part one AND your Windows Firewall are configured to do so (or both disabled). This is a common mistake!

2. When configuring your NIC do not forget to set the Default-Gateway to be the Router´s interface that you are connected to.

4. Try to do a ping from your computer to the router address and from the router to your computer

4. ALWAYS BACKUP the current IOS loaded in the Router (copy flash: tftp:), so, if anything goes wrong, at least you can do a XModem copy and recover the router.

5. Make sure to use the correct name of the new IOS File (including the file extension).

Well... right now those are the bigger reasons I can think about it... 90% of the time, somebody forget to turn-off the firewall or do not configure the NIC correctly.

If anybody wants to add any other, just let me know!