Showing posts with label Switching. Show all posts

Monday, September 29, 2008

SDM - Switch Database Modifier

SDM is used for memory management on your switches. Anytime you hear the "Memory Management"  keyword  that means SDM in your switches.

Switches comes with a finite amount of memory, and, you may need to optimize your switch  to support all L2/L3 memory requirements for a specific type of traffic.

It brings us many possibilities of how we´re going to use the switch memory! But, the real question is... how to do it?!

We got default profiles, just keep in mind, no matter which profile you choose, it won´t break your lab, on the other hand, it can bring serious damages to a real network! So, always, plan before configuring anything!

The SDM Templates are used to optimize the switch for specific features, for IPv4 we have:

  • Access — The access template maximizes system resources for access control lists (ACLs) to accommodate a large number of ACLs.
  • Default — The default template gives balance to all functions.
  • Routing — The routing template maximizes system resources for unicast routing, typically required for a router or aggregator in the center of a network.
  • VLANs — The VLAN template disables routing and supports the maximum number of unicast MAC addresses. It would typically be selected for a Layer 2 switch.

So, anytime we change the SDM, which by the way, it´s the only command about Memory Management, we MUST reload the switch in order for to take effect! This is very important! If you do not reload the switch, and the proctor issue a show sdm and it shows it´ll be "routing"  on next reload, you lost your section points!

The configuration is pretty straight-forward, for example, to optimize routing, we use the global configuration command sdm prefer routing and that´s it, check this example:

Switch(config)# sdm prefer vlan
Switch(config)# end
Switch# reload
Proceed with reload? [confirm]

DO NOT forget to reload! Otherwise it won´t take effect! If you issue a show sdm before the reload, your output will look pretty much like this one:

Switch# show sdm prefer
 The current template is "desktop routing" template.
The selected template optimizes the resources in
the switch to support this level of features for
8 routed interfaces and 1024 VLANs.
  number of unicast mac addresses:            3K
  number of igmp groups + multicast routes:   1K
  number of unicast routes:                   11K
    number of directly connected hosts:       3K
    number of indirect routes:                8K
  number of qos aces:                         512
number of security aces:                    1K
 On next reload, template will be "desktop vlan" template.

Not difficult at all right?! More information can be found at:

http://cisco.com/en/US/docs/switches/lan/catalyst3560/software/release/12.2_46_se/configuration/guide/swsdm.html

Tuesday, September 23, 2008

Don´t believe "only" in the show run (in my case, in the show conf)

Hmm... buddy! Let me tell you something... don´t believe only in the show run, always check every parameter involved using other show commands...

Why do I say that?! Last weekend, during a new WS-3750 installation for user access, I faced a little problem... Two core´s, and my new access switch, with links to both Core Switches. Trunk was limitted only to the management vlan to avoid any problems during the intervation.

In order to avoid any other problems, I´ve increased to Spanning-Tree cost to 25 in both uplinks (1Gbps) from the access switch to the cores.

So far so good! Installation done with the first core, ok, let´s connect the second! Hmmm... lost access, let me try again, ok, accessing normal, so what happened?! Root Port from Core 1 changed to the Access Switch?! Why?!

That´s when I´ve found that one of the Core Switches had  spanning-tree costs of 3004, 3019... WTH! Quick show conf (yes, it is CatOS), the Core was configured with UpLinkFast...

No biggie, changed spanning-tree cost, path went back to normal, and everything else was good! Customer will check how and when to remove the UpLinkFast configuration.

If at any time, I´ve checked the spanning-tree with show commands (not the show conf), I would see that, but... living and learning, right?!

Now I do know why some guys don´t like to do a show run, they preffer to check with other commands, I think they´re right... ;)

Friday, September 19, 2008

Storm-Control everything you need to know

Another part of the IPExpert Security Video-on-Demand, Storm-Control!

Storm-Control can be used to limit, or to set thresholds for different types of traffic (Broadcast, Multicast and Unicast) on a specific interface you choose (or that you´re asked for). ;)

You can set your threshold to whatever the top level that you want, and the traffic will be limit to that. Also, on 3560 Switches you can set falling thresholds too! Basically it is telling the switch how much traffic do I want (or don´t I want) through that interface.

Now... to the tricky part... just suppose you want to limit the broadcast/multicast traffic in a specific interface... how would you set?! Would you allow more Broadcast traffic than Multicast?!

Hmm... good question, let´s step back for a while... What´s a Layer 3 Broadcast?!

A Layer 3 Broadcast can be the "All Hosts" which is the 255.255.255.255, or it can be a "Subnet Brodcast", for example 172.168.10.255 is the broadcast IP of the /24 subnet;  just keep in mind that if the actual subnet mask change, the Broadcast IP will also change too!

Now... how about Layer 3 Multicasts?! What those guys are? 

Layer 3 Multicasts, known as Class D also, begin with the binary value of 1110 in the first octet. It goes from 224.x.x.x to 239.x.x.x. Also, at Class D we don´t have concept of subnetting of or broadcast reachability! So Broadcasts and Multicasts at "Layer 3" have nothing to do with each other.

Ok! With all that in mind, can you make a decision on how to configure the Storm-Control in one of your switch ports to limit the Broadcast / Multicast traffic?! Not that fast right?! There´s another wonderful world outside "Layer 3" it´s called "Layer 2" ! :)

At Layer 2, Broadcasts are know as "All F´s" FF-FF-FF-FF-FF-FF, this address represents all devices in a Layer 2 network, we all know that since the CCNA days, so, no big deal!

Now... The Layer 2 representation of IP Multicasts all begin with 01-00-5E. And there´s one specific bit in the MAC Address that defines whether or not it´s a Multicast, the I/G bit!

Take a look at the MAC Address format:

image

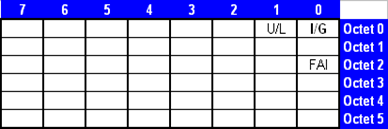
So, like our friend Scott Morris likes to say, the least significant bit of the most significant byte is the I/G bit! And looking at our Multicast Address 01-00-5E (in binary 0000 0001-0000 0000-0101 1110)  we can see that this I/G bit is set to 1 in EVERY Multicast!

In that case, the I/G bit defines a Multicast when it´s set to 1, but, how about the Broadcasts?! All bits in a Layer 2 Broadcast are set to 1 (including the I/G bit), so, Layer 2 Broadcasts, in fact, ARE a subset of Layer 2 Multicasts.

All Layer 2 Broadcasts are Multicasts.

All Layer 2 Multicasts are not Broadcasts.

With that in mind, when configuring Storm-Control in a switch port, and, if you´re setting limits to both Multicast and Broadcast, you should set Multicast limit HIGHER than the Broadcast limit (at least set they equal, but never set the Multicast level to be less than the Broadcast level, otherwise, either Broadcasts and Multicasts will be limited by the Multicast level, making pointless the Storm-Control configuration for the Broadcast!).

It´s configured on a per-interface basis, here´s the command list:

(config-if)#storm-control broadcast level (#)[.(#)]
(config-if)#storm-control multicast  level (#)[.(#)]
(config-if)#storm-control unicast level (#)[.(#)]


Level is % of line as maximum threshold
Level 100 would permit everything
Level 0.0 would disable the frame type

The following example will enable Unicast Storm-Control on a switch port with an 89% rising suppression level and a 67% falling suppression (remember, falling suppression can only be configured in 3560). It´ll also enable Broadcast Storm-Control on a port to a level of 20%. When the Broadcast exceeds the configured level of 20% of the total available bandwidth of the port within the traffic-storm-control interval, the switch drops all broadcast traffic until the end of the traffic-storm-control interval:

interface gigabitethernet0/1
storm-control unicast level 89 67
storm-control broadcast level 20

Just remember, Multicast levels (which includes more things) must be higher, or at least equal, to the Broadcast levels when configuring Storm-Control!

You can use the show storm-control command to verify the operation!

Nice! :)

More information available in do following Websites:

http://tcpmag.com/qanda/article.asp?EditorialsID=317

http://www.synapse.de/ban/HTML/P_LAYER2/Eng/P_lay207.html

http://www.faqs.org/rfcs/rfc1469.html

http://www.cisco.com/en/US/docs/switches/lan/catalyst3560/software/release/12.2_46_se/configuration/guide/swtrafc.html

Wednesday, September 10, 2008

802.1x, Guest VLAN and Auth-Fail VLAN

Another security topic from IPExpert videos: 802.1x, nice, not too long, and easy to understand.

Dot1x is a specification for port based authentication, most of the time we hear about 802.1x is when somebody is talking about Wireless (hi Shiraishi). Basically it uses the same concept there, but it was originally created to be a switch based authentication mechanism.

By default, 802.1x uses RADIUS. This is where RADIUS, TACACS and AAA comes on the LAB, and that´s why they´re on the blueprint.

Also, keep in mind that there´s no RADIUS server on the CCIE R&S Lab Exam. So take a look at your diagram, check where the RADIUS server is "pretended" to be connected, and at the details they´re giving to us before stressing too much over it!

So, until the device is authenticated, 802.1x access control allows only Extensible Authentication Protocol (EAP) over LAN (EAPOL) traffic through the port to which the device is connected. After authentication is successful, normal traffic can pass through the port.

If the switch receives EAPOL packets in a port that is not configured for 802.1x authentication or if the switch does not support 802.1x authentication, then the EAPOL packets are dropped and are not forwarded to any upstream devices.

802.1x needs to be turned on globally and configured at each interface you actually want it:

To turn dot1x on:

(config)#dot1x system-auth-control

And at the interface:

(config-if)#dot1x port-control <type>

The type can be:

  • Auto - If this particular interface doesn´t receive a response from the host, the port will be disabled. It´ll send out the EAPOL packets  (Extensible Authentication Protocol), those EAPOL packets are basically saying: "Hey! Who are you?!" And hopefuly the switch gets a response! If it doesn´t get a response, by default, the port is not enabled. The users will not be able to access the network without authentication;
  • Force-authorized - No authentication is performed, it just pretend that the authentication just happened.  It´s normally used for routers;
  • Force-unauthorized - Similar to shutdown. It pretends that this port wasn´t authorized.

802.1x, Radius and AAA works really close to each other! 802.1x will send EAPOL packets and control the access, AAA will tell the Router/Switch "HOW" to authenticate, and Radius will authenticate the requesting host if configured to do so.

Be careful when doing AAA, otherwise you may get locked out of your switch, and that will force you take your lab again, with better lucky (or better prepared) next time!

Fortunately there are some technics to avoid locking yourself out of the switch! I´ve talked about that before (click here if you want to check that post), but, I consider it so important, that I´ll copy the contents here:

-> Turning 802.1x on in your system (also enabling RADIUS):

dot1x system-auth-control
aaa new-model
aaa authentication dot1x default group radius
radius-server host 150.100.220.100 key ipexpert

-> To avoid further complications with any port using "login" you´ll want to create a workaround. The Proctor will NOT do password recovery for grading you! So, we need to create a workaround for this:

aaa authentication login MyVTY line
aaa authentication login MyCon none
!
line con 0
login authentication MyCon
!
line vty 0 4
login authentication MyVTY

-> That way, Console will have no password, and the VTY will use the configured line password.

-> The bottom line is that while it is very irritating to lock yourself out of a switch it is MUCH better than locking the Proctor out!

-> Another thing you may do is "reload in 10" on the switch. If you haven´t validated your config and cancelled the reload, then at least you will fix things yourself!

-> (Do NOT save unvalidated configurations!!!)

As we go through we´re only going to do AAA authentication login, that´s the type of authentication we´re going to do.

But now, if someone responds to the EAPOL packets with incorrect credentials, or even worse, if someone doesn´t have a computer that supports 802.1x and don´t know how to respond to it?! What happen to those guys?! By default, the switch will keep sending EAPOL packets until it receives the correct credentials.

And that´s it?! Those guys will not be able to access the network?! Well, if we want yes, they´ll be out, but, we´re not that mean, right?! We can configure a "guest" VLAN, with limited access to the network, so those guys will be placed there!

With guest-vlan information (or with auth-fail vlan information) we have ways to setting up some options. The port needs to be at  mode access (can´t be dynamic in dot1x):

int fa0/10
switchport mode access
dot1x port-control auto
dot1x guest-vlan 100
dot1x auth-fail vlan 100
dot1x host-mode multi-host

That way, if the guy doesn´t support 802.1x authentication (or, if it´s not configured to do so), it´ll be allowed to use the configured guest-vlan (in our case VLAN100).

Also, if the guy use incorrect credentials (like wrong username/password), it´ll be allowed to use the auth-fail vlan (in this particular case, VLAN100 also).

But, how about that dot1x host-mode multi-host command, what´s that?! That will do 802.1x authentication for EVERY MAC Address using this link.

On the other hand, if we use the command dot1x host-mode single-host  as long as one MAC Address is validate, every MAC Address in this single link is allowed to go through!

Cool!

You can find more information at this link if you want:

http://www.cisco.com/en/US/products/hw/switches/ps708/products_configuration_example09186a00801d11a4.shtml

Monday, September 8, 2008

Switchport port-security - what we MUST know

Continuing with the IPExpert CCIE R&S BLS Security section, it´s a short video (40min), but, with a lot of good information! Security has always been one of my biggest weakness, so that´s why I´m depicting it topic by topic, that helps me to either learn it  better, and, if I ever need to review my notes, I´ll have everything splited to it´s own topic here! So that´s good! Hope that helps you too!

To begin with... how do we enable the port-security in a switch port?! That´s easy to answer, using the interface command: switchport port-security. But, what will be actually configured in this specific switch port if  we just type this command and nothing else?! It´ll set the switchport to allow only "one" MAC Address and the Violation mode will be set to Shutdown.

Probably the LAB will ask you something more specific, that´s where you have to know a few things... The violation mode for example, we have three violation modes availabe:

  • Protected - When a violation occurs, it´ll simple ignore any exceeding MAC Addresses, according to your configuration (if you allow only one MAC Address, it´ll permit the first MAC Address to transmit, and drop everything else for any new MAC Address trying to transmit to this port).
  • Restrict - Does exactly the same thing as Protected mode, but will also send a SNMP Trap regarding the violation.
  • Shutdown - When a violation occurs in the shutdown mode, it sets the port to ERRDISABLE state. The port will stop transmitting anything in the ERRDISABLE state, also, the port LED will  turn off. It  sends out a SNMP Trap about this.

When a port enters in the ERRDISABLE state you can do a shut and no shut to recover it! That can be a boring task, if you have many "smart users" in your network. Fortunately, there´s another way to do that, you can also set it to "autorecovery" using the feature errdisable recovery (global configuration mode), the commands for this are:

errdisable recovery cause <violation cause>
errdisable recovery interval <#seconds>

For example, if the Port-Security placed a port in ERRDISABLE state, you can set your switch to recovery it like that:

errdisable recovery cause psecure-violation
errdisable recovery interval 1800

That will recover the port 30min (1800sec) after the violation event! Cool! :)

Another thing to keep in mind is: the command switchport port-security mac-address <MAC> by itself will not get the configured MAC Address into the running-configuration of your switch. If you issue a show switchport port-security you´ll see the configured MAC  there, but not in the show run!

In order to have it in your running configuration, you have to use the STICKY keyword: switchport port-security mac-address sticky <MAC> that way, the configured MAC Address  will appear at the running-configuration, and of course, you´ll be able to save it! If you do not specify any MAC Addresses after the STICKY keyword, the switch will dynamically learn the attached MAC Address and place it into your running-configuration.

So, for example, to allow two MAC Addresses (1111.1111.1111 and 2222.2222.2222) at FastEthernet 0/6 (configured as an access-port), and, if any violation to that rule occurs, the port should be placed in ERRDISABLE state,  recovering itself after 1hour without any intervation. The MAC Address MUST appear in the running-configuration.

How can we solve that!? Not that difficult, right!? Here´s the answer:

conf t
!
errdisable recovery cause psecure-violation
errdisable recovery interval 3600
!
interface fastethernet 0/6
switchport mode access
switchport port-security violation shutdown
switchport port-security maximum 2
switchport port-security mac-address sticky 1111.1111.1111
switchport port-security mac-address sticky 2222.2222.2222
exit

That will meet the requirements of our question!

Also, if you issue a switchport port-security ? under the interface configuration mode you´ll have all available options for this command (in fact, there are just a few options).

Is it difficult?! Not at all, but, there are some things to keep in mind to be used either in the exam and in real-life networks!

You can find more information at the following link from Cisco Website:

http://www.cisco.com/en/US/docs/switches/lan/catalyst3560/software/release/12.2_46_se/command/reference/cli3.html#wp1948361

Tuesday, August 26, 2008

Private VLANs (PVLANs)

Until now, I thought PVLANs were a bit  difficult to understand and to implement, like when studying to CCNP that took me a while to digest, and I had some doubts about it, till today! Man... how simple it is, and there´s no much "magic" in that (like our friend Scott Morris usually says)!  Pretty straight-forward and no big deals! The Security Video from IPExpert is AWESOME. It´s short, informative, to the point, and solved MANY questions I´ve for a while in minutes! Man! What a nice way to do it!

So, let´s get into that:

There are tree type of Private VLANs Ports:

  • Promiscuous (P) - talk to everyone (usually connected to the exit Router, DNS, DHCP Server, NTP Server);
  • Isolated (I) - only talk to Promiscuous ports;
  • Community (C) - talk to others in the same Community & Promiscuous ports.

To have PVLANs configure the Switch MUST be in Transparent VTP mode, otherwise, it´ll not work.

Just keep in mind that when you configure your switch to VTP Transparent mode, you do not loose what you´ve learned so far, you´re just not gaining anything new about the changes from now on!

Hosts in different PVLANs are all in the same IP Subnet, BUT, they´re not able to talk to others in different community or isolated VLANs! That´s the main goal of a PVLAN, to split the VLAN domain into multiple isolated broadcast subdomains. But if one Community VLAN needs to talk to other Community VLAN?! Well... that can be done through a Router or L3 Switch. Also, you can apply some access-lists and other security features to permit only the things you want to pass through!

The best way to explain this is using an example, so check our topology, we´ll concentrate on the PVLAN ports:

PVLAN

There are three Community VLANs (there can be more if you want) so you put every client inside it´s own Community VLAN, avoiding that one client talk to another. That means Customer A could have a WebServer, and some other application server inside it´s own Community VLAN, and those equipments will be able to talk to each other, but they´ll NOT be able to talk to equipments in other Community or Isolated VLANs.

But, wait a minute, we´ve created one Community VLAN for each customer, and only one Isolated VLAN?! If we have more customers needing Isolated ports?! Should we create more Isolated VLANs?! The answer is NO. Isolated Ports only talks to the Promiscuous Ports and not to each other. So each customer inside an Isolated Port will be confined to this port only plus the Promiscuous Port.

First, lets go ahead and create our VLANs:

SW1 and SW2:

vlan 10
private-vlan primary
exit
!
vlan 101
private-vlan isolated
exit
!
vlan 102
private-vlan community
exit
!
vlan 103
private-vlan community
exit
!
vlan 104
private-vlan community
exit
!
vlan 10
private-vlan association add 101-104
exit

So, VLAN10 is our  Promiscous VLAN, and it´s associated to ALL other VLANs (101, 102, 103 and 104).

Now, we´ll associate each port to it´s VLAN, check it out:

SW1:

interface fa0/3
switchport mode private-vlan host
switchport private-vlan host-association 10 104
!
interface fa0/4
switchport mode private-vlan host
switchport private-vlan host-association 10 104
!
interface fa0/7
switchport mode private-vlan host
switchport private-vlan host-association 10 102
!
interface fa0/8
switchport mode private-vlan host
switchport private-vlan host-association 10 102

SW2:

interface fa0/3
switchport mode private-vlan host
switchport private-vlan host-association 10 101
!
interface fa0/4
switchport mode private-vlan host
switchport private-vlan host-association 10 103
!
interface fa0/5
switchport mode private-vlan host
switchport private-vlan host-association 10 103
!
interface fa0/2
switchport mode private-vlan promiscuous
switchport private-vlan mapping  10 add 101-104

Every device MUST be associated with the promiscuous VLAN (in our case VLAN10)! Beyond that they´ll be associated with the non-promiscuous  (the isolated or community VLANs) in order to specify how those ports will behave! That´s why ALL ports are associated with VLAN10 + it´s own VLAN.

So, what can be connected in the Promiscuous VLAN?! Normally the devices that are common to everybody, and needs to talk to all VLANs, like Routers, DNS Servers, NTP Servers, DHCP Servers, and many others!

You can verify your configuration using the "show vlan" command. The info regarding PVLANs will be at the end of the output of this command.

A good advice from the IPExpert Video is that the current IOS on the LAB (12.2.25) doesn´t allow us to use switchport port-security commands and private-vlans  at the same port at the same time!  Once it hits a newer version (12.2.40) (that can happen anyday Cisco wants) we´ll be able to do that!

Ok! But... do you know that 3550 doesn´t support PVLANs?! Yep.., me neither! They´ve a feature named Switchport Protected for that, it´s really simple, and for example, if we have 15 devices in a vlan, but, only two of them are protected (with the interface command switchport protected), they can talk to everybody else, but not to each other!

So one protected device will not talk to other protected device! It works just like an isolated vlan. No unicast, multicasts, broadcasts between protected ports!

Not that difficult, right?!

Saturday, August 23, 2008

VACL, VLAN Maps & MAC ACL

A while back, more specific in July/14 we talked briefly about VACLs. That was when I took the IPExpert Volume 1 - Section 2: Quad Catalyst (PVST+) Switch Configuration. It´s not a very difficult task to be achieved, but TRICKY!

A friend from India (yeah Vipul, it´s you buddy!) asked me some things about it. So I´ll just elaborate it a while more. Also, at IPExpert CCIE R&S BLS you´ll find more info regarding that in the Security Section. It´s really well explained there! I would take sometime and review it with attention. The first time I watched it, I was like moving back and forward all the time to take notes, and to really stick the info in my head!

So,  starting with the basics... In a L2/L3 switch (like the ones in the CCIE Lab), where we can implement security?! Well, we can do it at the:

  1. Port Level - We can implement an Access-List in a particular port, and that will affect the traffic coming and going out of it (normally, it´ll affect only one host traffic). But imagine to implement that solution in many ports, over several equipment. Not very nice, right?!
  2. SVI - We can also implement an Access-List at the SVI Port! It´ll work everytime your switch is routing traffic between this particular VLAN and some other! Essentially, it´ll filter the traffic passing through the SVI.

Ok! So... Port-Level filters only that particular port.... SVI the routed traffic... and how about the INTRA-VLAN Traffic?! None of them will filter that!

VLAN Access-Lists (or VACL) works exactly there! At the Intra-VLAN Traffic! So everytime you need to filter internal traffic for a particular VLAN, VACL is your choice!

Just a couple more things to have in mind before getting into an example.

  1. IP Packets can only be processed by IP Access-Lists;
  2. Non-IP Packets like ARP, MAC-Addresses, and others can only be processed by MAC Access-Lists.

The MAC Access-Lists will bring all the interesting issues to the table... just check it out!

Let´s suppose for example you have two computers one with MAC Address 000b.dc24.ca47 and the second with the MAC Address 000b.dc25.cb51, both connected to VLAN7, and you want to allow all "non-IP" frames sourced from those two MAC Addresses to be forward anywhere, and also allowing only ICMP for example, denying everything else!

So, we have two different requirements there...

  1. Forward all "non-IP" frames sourced from those two specific MAC Addresses; That requires a MAC Access-List.
  2. Permit only ICMP, denying everyting else. That requires an IP Access-List (the one we´re all used to).

Ok, so let´s create our MAC Access-List:

mac access-list extended AllowThose
permit 000b.dc24.ca47 any
permit 000b.dc25.cb51 any

That will handle the first requirement.

Now the second one IP Access-List allowing ICMP and denying everything else:

access-list 101 permit icmp any any

Ok! Now, we need to create the VACL (or VLAN Maps, which one you preffer to call it) applying those rules:

vlan access-map Filter-VL7 10
action forward
match mac address AllowThose
!
vlan access-map Filter-VL7 20
action forward
match ip address 101
!
vlan access-map Filter-VL7 30
action drop

Now it looks ok, right?! Time to apply it to VLAN7 ?! What do you think about?! Let´s try?!

vlan filter Filter-VL7 vlan-list 7

Now testing! See if you can ping! Not working?! Hmmm... interesting... but why?! Well... I told... The MAC Access-List would bring all the interesting issues to the table! And, in fact,  it did! It´s allowing only those two MAC Address and nothing else! How about ARP?! Do we need it to make things work?! Of course we do! And that´s where we have most confusion! Just keep in mind, the end of an Access-List is always deny any any! So if there are no matching instances for ARP in the MAC Access-List, it´ll be dropped!

How to fix it?! Simple, allow it in the MAC Access-List:

permit any any 0x0806 0x0000
permit any any lsap 0xAAAA 0x0000

But wait a minute! What´s that 0x0806 and lsap 0xAAAA ?! That´s the Ethertypes we´re allowing in our MAC Access-List, first one (0x806) is ARP, and the second one (lsap 0xAAAA) is PVST+. You do not want your switch running unprotected from loops right?! So it´s better to allow it!

For the sake of simplicity, the full configuration would be this one:

mac access-list extended AllowThose
permit 000b.dc24.ca47 any
permit 000b.dc25.cb51 any
permit any any 0x0806 0x0000
permit any any lsap 0xAAAA 0x0000
!
access-list 101 permit icmp any any
!
vlan access-map Filter-VL7 10
action forward
match mac address AllowThose
!
vlan access-map Filter-VL7 20
action forward
match ip address 101
!
vlan access-map Filter-VL7 30
action drop
!
vlan filter Filter-VL7 vlan-list 7

The most common Ethertypes are: (and probably the ones asked in the LAB)

  • 0x0806 = ARP
  • lsap 0xAAAA = PVST+
  • 0x4242 = STP and PVST
  • 0x86DD = IPv6

Again... we need to understand all the little pieces involved in a particular task, and remember about the basics, OSI Model, ARP, and so on! It´s not difficult, but it´s a little confusing at the first time! Just go ahead, drink some watter (I did it several times) come back again, read over, and try some scenarios yourself, don´t have equipment?! Try it on Notepad, just try some, compare with the example, and you´ll see how easy it can be! The best way to learn is trying it yourself! ;)

You can also find a nice explanation about that in the wonderful Arden  Packeer´s Blog, just click here and it´ll direct you to the post.

Thursday, August 14, 2008

ARP, RARP, Proxy ARP, Gratuitous ARP and IP Redirect

Well... after a while away from my computer (in fact, away from any computer) due to some medical issues I´m back! Don´t worry, nothing bad, it was scheduled already, and I had the company of my wife, and guess who?! Yeah! Him! Mr. Jeff Doyle, not in person, but in his book version!

Books like TCP/IP Vol. 1 and 2 MUST be read from cover to cover! Always a good thing to learn!

Some of you may think, ARP, too basic... Yeah, I think too, but there were more than 10, 20 times that people who were supposed to know this asked me HOW it works... so here (with mr. Doyle´s help) you´ll find ARP some variations of  it.

ARP

Address Resolution Protocol (ARP) is used to map a known IP Address to a unkown data-link identifier (for example MAC Address). The ARP Request will contain:

  • Source IPv4 Address;
  • Source data-link identifier address (MAC Address for example);
  • Destination IPv4 Address;
  • Destination data-link identifier (MAC Address in our example) will be set to 00:00:00:00:00:00.

Check this ARP Request capture:

Ethernet II, Src: 00:30:b8:83:cb:40, Dst: ff:ff:ff:ff:ff:ff
    Destination: ff:ff:ff:ff:ff:ff (Broadcast)
    Source:
00:30:b8:83:cb:40  (00:30:b8:83:cb:40 )
    Type: ARP (0x0806)
    Trailer: FFE000200020003035800000FFE000100030               Address Resolution Protocol (request)
    Hardware type: Ethernet (0x0001)
    Protocol type: IP (0x0800)
    Hardware size: 6
    Protocol size: 4
    Opcode: request (0x0001)
    Sender MAC address:
00:30:b8:83:cb:40 (00:30:b8:83:cb:40)
    Sender IP address: 201.6.115.1 (201.6.115.1)
    Target MAC address: 00:00:00_00:00:00 (00:00:00:00:00:00)
    Target IP address: 201.6.115.254 (201.6.115.254)

By default Cisco Routers holds the ARP entries for 4 hours. You can change this value per interface basis with the command: arp timeout <value in seconds>. Example:

interface fastethernet 0/0
arp timeout 3600

RARP

RARP is the opposite of ARP, it maps an IPv4 Address to a know MAC Address, for example, old workstations  (dumb terminals) could have it´s firmware programmed to send a RARP request as soon as it was powered up, and a RARP Server would answer this RARP request with the workstation´s IP Address (Airline Companies used it ALOT in the past). Hmmm.. looks like DHCP right?! Yeah.. it looks, but it ISN´T ok?! ;)

RARP Request will contain:

  • Source and Destination data-link identifier (MAC Address in this example) will be the local host MAC Address;
  • Source and Destination IP Address will be set to 0.0.0.0.

Check this example capture of a RARP Traffic:

Ethernet II, Src: Marquett_12:dd:88, Dst: ff:ff:ff:ff:ff:ff
    Destination: ff:ff:ff:ff:ff:ff (Broadcast)
    Source:
Marquett_12:dd:88  (00:00:a1:12:dd:88)
    Type: ARP (0x0806)
    Trailer: FFE000200020003035800000FFE000100030               Address Resolution Protocol (reverse request)
    Hardware type: Ethernet (0x0001)
    Protocol type: IP (0x0800)
    Hardware size: 6
    Protocol size: 4
    Opcode: reverse request (0x0003)
    Sender MAC address:
Marquett_12:dd:88  (00:00:a1:12:dd:88) 
    Sender IP address: 0.0.0.0 (0.0.0.0)
    Target MAC address:
Marquett_12:dd:88  (00:00:a1:12:dd:88) 
    Target IP address:
0.0.0.0 (0.0.0.0)


---> EXAMPLE TOOK FROM Wireshark Wiki <---

Proxy ARP

A Proxy ARP enabled Router answers ARP requests intended for another machine, it does that by making the local host believe that the Router is the "owner" of that IP Address, local host will forward the traffic to the Router and the Router will be responsible to "route" the packets to the real destination.

For example, a Host in Subnet A wants to send traffic to Host in Subnet B, Host A and Host B are in the same subnet, but in different broadcast domains. Host A will send an ARP Request with Host B IP Address, the Router connected to both subnets will answer to Host A request using it´s own MAC Address instead of Host B MAC Address.

Now when Host A wants to transmit traffic to Host B, it´ll send to the Router MAC Address and the Router will just forward the traffic to Host B. That´s why "Proxy ARP".

It´s used on networks where the hosts are not configured with a default-gateway.

Oh yeah... it´s enabled by default in the Cisco IOS, and you can disable it on a per-interface basis with the command: no ip proxy- arp

Gratuitous ARP

In some circunstances a Host (Router, Switch, Computer, etc) might send an ARP Request with it´s own address  as the target address... But, to his own address?! Why a host would do that!?

Well... there are some reasons... for example:

  • It´s use to update other devices ARP Table (when a device receives an ARP Request with an IP that it´s already in it´s cache, the cache will be updated with the new information;
  • HSRP Routers that takes over the control will send Gratuitous ARP out the network to update the cache table of other devices ;
  • To check for duplicate addresses (if the host receives a response, it´ll know that somebody is using the same IP Address).

You can check this Gratuitous ARP traffic captured with Wireshark (the best opensource sniffer out there):

Ethernet II, Src: 02:02:02:02:02:02, Dst: ff:ff:ff:ff:ff:ff
    Destination: ff:ff:ff:ff:ff:ff (Broadcast)
    Source: 02:02:02:02:02:02 (02:02:02:02:02:02)
    Type: ARP (0x0806)
    Trailer: 000000000000000000000000000000000000
Address Resolution Protocol (request/gratuitous ARP)
    Hardware type: Ethernet (0x0001)
    Protocol type: IP (0x0800)
    Hardware size: 6
    Protocol size: 4
    Opcode: request (0x0001)
    Sender MAC address: 02:02:02:02:02:02 (02:02:02:02:02:02)
    Sender IP address: 192.168.1.1 (192.168.1.1)
    Target MAC address: ff:ff:ff:ff:ff:ff (Broadcast)
    Target IP address: 192.168.1.1 (192.168.1.1)


---> EXAMPLE TOOK FROM Wireshark Wiki <---

IP Redirect: 

IP Redirect is used by routers to notify hosts of another router on the data link that should be used for a particular destination.

For example, Router A and Router B are connected to the same Ethernet Segment, so as Host C. Host C has Router A set as default-gateway, Host C will send the packets to Router A, and Router A sees that the destination address of the packet is reachable via Router B, so Router A must forward the packets out the same interface it has received to Router B. Router A does that, and also, sends an ICMP Redirect to Host C informing to use Router B to reach this particular destination next time.

IP Redirect is enable by default in IOS Routers and can be disabled on a per interface basis with the command: no ip redirects.

That´s it! I´ll lie down a while, my head is a little fuzzy right now!

Tuesday, July 29, 2008

Switch Macros

Take a look at this examples of Switch Macros  available at the Switching Video-on-Demand from IPExpert, just a few, but, the possibilities for it are huge!

First one... Create a Macro to configure our "Access-Ports", this will include the VLAN, Portfast, BPDUGuard and Storm-Control... Seens simple... but how the assign the correct VLAN to each port?! Using variables!  Take a look:

macro name Port
switchport mode access
switchport access vlan $V
spanning-tree portfast
spanning-tree bpduguard enable
storm-control $T level $L
@

Now,  apply this to port FastEthernet 0/10 for example, and assign it to VLAN 10, Storm-Control Type Broadcast and Level 20:

int fa0/10
macro trace Port $V 10 $T broadcast $L 20

See?! Easy! One line, instead of 5!

In the show run, the field macro description Port | Port will show us how many times this macro "Port" (the one we created earlier) was applied to this interface (in this specific case, 2 times!).

Macro Example

Another example, a macro to create some VLANs:

macro name MakeVlan
vlan 101
name My101
vlan 102
name My102
vlan103
name My103
exit
@

Just be careful, after the last VLAN (in our case vlan103) we need to type exit, if you don´t, this VLAN will not be created!

We can double check if everything is ok with the command: sh vlan brief

Another tip in this Video is if you get asked to assign a data VLAN, Voice VLAN and Portsecure allowing 2 Mac-Addresses in this port using just one command line (I talked briefly about it yesterday), how to do it?!

Seens a bit strange, but possible, first, check the Macros "pre-defined" in your switch using the command: show parser macro , your output will look much similar to this one:

Show Parser Macro Example

Now that we found our macro, apply it to the desired interface:

int f0/16
macro apply cisco-phone $access_vlan 10 $voice_vlan 20

And finally, take a look at the configuration:

Macro Apply

You may ask yourself, how the proctor is going to grade that?! How he´s going to know that I actually used a Macro, or even better, how he´s going to know that I didn´t created a Macro to do it, and just deleted from the Switch after that?!

Well... the answer is simple... first, take a look at the line: macro description cisco-phone this description is telling us that this specific macro (cisco-phone in this case) was applied to this interface. Also, the macro configured the VLANs (Data and Voice) and Portsecure as asked, but it also configured some extra stuff (QoS, Portfast, etc), and that tells the Proctor that you actually used this macro! So, be cool, just understand exactly what the question is asking, and you´ll be fine!

To apply a macro we can use the commands:

  • macro apply <macro-name>
  • macro trace <macro-name> -> if you want to see it going through the commands.
  • macro global apply <macro-name>
  • macro global trace <macro-name> -> if you want to see it going through the commands.

Monday, July 28, 2008

Dead Weekend + Switching Video

Last weekend was not very "usefull" to study... I´ve started working on friday at 08:00am, till saturday 09:00am, that plus travel time from home-work, work-home is more than 28hours straight! So I pretty much spent my saturday sleeping... When I finally woke up, with a terrible headache (anyone want to guess why?!), my wife had this "dinner" plan with a couple friends, so, well... I couldn´t say no... We went out. It was fun... but we came back home a little late, so I woke up late on sunday (again)!

Couple house things to solve, shower to replace, get something to eat, and that´s it, almost 07:00pm, and no study! Oh my! So I sit in front of my computer and started watching IPExpert CCIE R&S BLS Switching Videos. As usual I got impressed! The quality of the material is unquestionable, those videos are AWESOME!!!! Again, you feel like you´re in class! Cool! :)

Very good stuff in the video, one point was, a lab tip, for instance if you need to configure something that will take a few lines to do it, but the lab asks you to configure it using JUST ONE command, well, it seens weird, but possible if you have a pre-defined macro in the switch (that is already there, not one that you create!), use the command show parser macro to check if there are any pre-defined macros in the switch, so, you may be able to do it just applying the macro itself!

Also, anytime you see a topology with a Switch in VTP Transparent mode in the middle (like VTP Server  <--> VTP Transparent <--> VTP Server) be affraid. The VTP Transparent Switch will forward the updates between the other two switches, but, if, for instance you "prune" a vlan, that can cause us some problems! If the VTP Transparent switch doesn´t have this VLAN (or, if the VLAN is inactive) no matter if your VTP Server switches are using it or not, this VLAN will get pruned (in the VTP Transparent switch), and that can create some issues in our lab. Off course, we can solve this issue in a couple different ways, like removing those specific VLANs from the "pruning", for this  use the command  switchport trunk pruning vlan remove <VLAN List>

Another way to solve this is just create the VLANs in the VTP Transparent Switch, and activate them! Use the command vlan <vlan number> state active if you want to active the VLAN with no ports assigned! It´ll all depend on your lab restrictions and requirements!

It also talk about MST, and give us some good "insights" to avoid problems in the LAB itself, check this example configuration:

  • Enable MST
    • (config)#spanning-tree mode mst
  • Configure MST
    • (config)#spanning-tree mst configuration
      • Name (tree-name)
      • Instance 1 vlan (#-#-#)
      • Instance 2 vlan (#-#-#)
      • etc

This example is creating 2 MST instances, but, in fact your switch will be running 3 MST instances (do not forget about the MST Instance 0, it´s always there), so if your lab asks to have just 2 instances in your switch, well, that will force us to create just one new MST Instance and put all VLANs inside it! ;)

There are many, many other really usefull stuff and explanations! I´ll try to work on some really nice examples regarding Macros that is also in the Video!!! Wait and see!

Thursday, July 17, 2008

Remote Switched Port Analyzer (RSPAN)

This week I had a task in the IPExpert Workbook Vol 1 to use RSPAN. It can be used to monitor source Ports, VLANs and destination ports on different switches in your network.

Ok, I´ve already configure SPAN (local switch only) and knew about RSPAN, but never did it before! Hmmm ok! Not that difficult, a quick look at the DocCD will be more than enough to figure that out, BUT, there are some tricks you might be aware about!

In order to configure RSPAN we´ll need to have an RSPAN VLAN, those VLANs have special properties and CAN´T be assigned to any access ports! Never!

Also, we can use an Access-List (if desired) to filter the output to monitor, those access-lists should be specified in the RSPAN VLAN in the RSPAN source switch.

You can configure any VLAN as an RSPAN VLAN as long as these conditions are met:

  1. The same RSPAN VLAN is used for an RSPAN session in all the switches.
  2. All participating switches support RSPAN.

Ok, so, let´s check a quick example on how to create the RSPAN VLAN:

vlan 250
remote span
end

In the above example VLAN 250 was configured as RSPAN VLAN, remember, to use VLAN IDs that are lower than 1005!

Now, configure the RSPAN Source Session:

Source Switch:

monitor session 1 source interface fastethernet0/1 tx
monitor session 1 source interface fastethernet0/2 rx
monitor session 1 destination remote vlan 250
end

Now the ports FastEthernet0/1 and FastEthernet0/2 are configured to be monitored and the destination is set to the RSPAN VLAN 250.

Finally, we need to create the RSPAN Destination Session:

Destination Switch:

monitor session 1 source remote vlan 250
monitor session 1 destination interface fastethernet0/7
end

That will send ALL traffic from RSPAN VLAN 250 to the fastethernet0/7, where we can plug our sniffer, traffic analyzer, or anything that we may need/want.

Seens pretty simple, right?! In fact it is! Really! BUT, just keep those few things in mind:

  1. The RSPAN VLAN should be allowed in ALL trunks between the involved switches (Source and Destination switches in this case);
  2. If you have enabled "pruning" in your network, remove the RSPAN VLAN from the pruning, with the command: switchport trunk pruning vlan remove <RSPAN VLAN ID> under the interface configure as trunk;

And that´s pretty much it! You can check if the RSPAN VLAN is allowed/pruned on the trunk with the command: show interface trunk

If you need more information regarding SPAN/RSPAN, just follow this link at Cisco´s Website:

http://www.cisco.com/en/US/docs/switches/lan/catalyst3560/software/release/12.2_44_se/configuration/guide/swspan.html#wp1036686

Friday, June 27, 2008

802.1Q Tunneling - IEWB Vol. 1 Version 5

Yesterday I started the IEWB Vol. 1 Version 5  Bridging & Switching section, a very nice part of it was about 802.1Q Tunnels.

I´ve saw it on theory, but never tried in real equipment. Nice, the task goal was to make R1 and R4 neighbors (when you perform a show cdp neighbors at any of those two routers they should display the other as a neighbor and not the switch directly attached!).

Some care must be taken, because the 802.1Q frame will be "double" tagged, first with the original VLAN ID information when exiting the router, and the second time when it enters the switch connected using the tunnel VLAN ID as a tag (called Metro Tag). By that, the frame will be increased in 4 bytes (802.1Q Metro Tag), and we must change the system MTU to match this new requirements in "all" switches were the frame is supposed to cross. This is accomplished with the global configuration command: system mtu 1504 in all switches in the path.

To simplify things, here follows a picture I´ve made about this particularly task:

dot1q4

Configuration done to perform that:

R1

interface FastEthernet0/0
no ip address
duplex auto
speed auto
!
interface FastEthernet0/0.14
encapsulation dot1Q 14
ip address 14.0.0.1 255.255.255.0
!
interface FastEthernet0/0.41
encapsulation dot1Q 41
ip address 41.0.0.1 255.255.255.0


SW1

system mtu 1504
!
interface FastEthernet0/1
switchport access vlan 100
switchport mode dot1q-tunnel
l2protocol-tunnel cdp
no cdp enable
!
interface FastEthernet0/13
switchport trunk encapsulation dot1q
switchport mode trunk


SW2

system mtu 1504
!
interface FastEthernet0/13
switchport trunk encapsulation dot1q
switchport mode trunk
!
interface FastEthernet0/16
switchport trunk encapsulation dot1q
switchport mode trunk


SW3

system mtu 1504
!
interface FastEthernet0/16
switchport trunk encapsulation dot1q
switchport mode trunk
!
interface FastEthernet0/19
switchport trunk encapsulation dot1q
switchport mode trunk


SW4

system mtu 1504
!
interface FastEthernet0/4
switchport access vlan 100
switchport mode dot1q-tunnel
l2protocol-tunnel cdp
no cdp enable
!
interface FastEthernet0/19
switchport trunk encapsulation dot1q
switchport mode trunk


R4

interface FastEthernet0/1
no ip address
duplex auto
speed auto
!
interface FastEthernet0/1.14
encapsulation dot1Q 14
ip address 14.0.0.4 255.255.255.0
!
interface FastEthernet0/1.41
encapsulation dot1Q 41
ip address 41.0.0.4 255.255.255.0

And off course, the result:

R1

Rack20R1#sh cdp neighbors
Capability Codes: R - Router, T - Trans Bridge, B - Source Route Bridge S - Switch, H - Host, I - IGMP, r - Repeater

Device ID  Local Intrfce  Holdtme   Capability  Platform  Port ID
Rack20R3   Ser 0/1         131       R S I      2611XM   Ser 1/2
Rack20R4   Fas 0/0         148       R S I      2611XM   Fas 0/1

Rack20R1#ping 14.0.0.4 size 1500 df-bit

Type escape sequence to abort.
Sending 5, 1500-byte ICMP Echos to 14.0.0.4,timeout is 2 seconds:
Packet sent with the DF bit set
!!!!!
Success rate is 100 percent (5/5),round-trip min/avg/max=4/6/8ms
Rack20R1#ping 41.0.0.4 size 1500 df-bit

Type escape sequence to abort.
Sending 5, 1500-byte ICMP Echos to 41.0.0.4,timeout is 2 seconds:
Packet sent with the DF bit set
!!!!!
Success rate is 100 percent (5/5),round-trip min/avg/max= 4/5/8ms


R4

Rack20R4#sh cdp neighbors
Capability Codes: R - Router, T - Trans Bridge, B - Source Route Bridge S - Switch, H - Host, I - IGMP, r - Repeater

Device ID  Local Intrfce  Holdtme  Capability  Platform  Port ID
Rack20SW2    Fas 0/0       131      R S I      WS-C3560- Fas 0/4
Rack20R1     Fas 0/1       136      R S I      2611XM    Fas 0/0
Rack20R5     Ser 0/1       139      R S I      2611XM    Ser 0/1

Rack20R4#ping 14.0.0.1 size 1500 df-bit

Type escape sequence to abort.
Sending 5, 1500-byte ICMP Echos to 14.0.0.1,timeout is 2 seconds:
Packet sent with the DF bit set
!!!!!
Success rate is 100 percent (5/5),round-trip min/avg/max=4/5/8ms

Rack20R4#ping 41.0.0.1 size 1500 df-bit

Type escape sequence to abort.
Sending 5, 1500-byte ICMP Echos to 41.0.0.1,timeout is 2 seconds:
Packet sent with the DF bit set
!!!!!
Success rate is 100 percent (5/5),round-trip min/avg/max= 4/4/8ms

More information can be found at Cisco´s Website.

Here you can find the path at the DocCD for this:

DocCD  -> Catalyst 3560 -> Catalyst 3560 Switches, Rel. 12.2(44)SE, January 2008 -> Catalyst 3560 Switch Software Configuration Guide, Rel. 12.2(44)SE -> Configuring IEEE 802.1Q and Layer 2 Protocol Tunneling

If you preffer, here follows the direct link to the page:

http://www.cisco.com/en/US/docs/switches/lan/catalyst3560/software/release/12.2_44_se/configuration/guide/swtunnel.html#wp1008908

Tuesday, May 27, 2008

VLAN Trunk Protocol (VTP) Basics

VLAN Trunk Protocol, or VTP, helps us to keep the VLAN Database consistent between our network. Some peaple just love it, others not so much... I use VTP when needed... But with carefull, one simple mistake, and you can bring your entire network down! (well... not that dramatic, but you can have a BIG headache with it!).

So, what VTP can do for us?! Well... it "propagates" the VLANs created in one Switch in the domain (acting as server) to other switches in the same domain (either acting as server or client), VTP makes adding, deleting and distributing vlan database easy.

Lets step back a while... How many VTP Modes exists?! There are three in fact, Server, Client and Transparent:

VTP 1

All changes made in a Switch working in the VTP Transparent Mode are locally significant.

Some general rules about VTP:

- VTP packets are only carried on trunks in vlan 1;

- VTP domain name is case sensitive;

- VTP only ‘services’ vlan 1-1005;

- Switch needs to be in VTP transparent mode if extended range vlans (1006-4094) are to be used.

VTP keeps tracks about the changes by checking the revision number (the higher the revision number, the newer the database version).

So far it looks great, but let´s supose you have a network working with the VTP Domain Cisco with no password set, and a revision number 13 (the revision number increases by 1 each time you make any changes in the VLAN Database).

Good, also supose you have a LAB with some switches used for training purposes, like new engineers, and they spent all day long creating, adding, changing vlans on that switch, and off course, they´ll set the same VTP Domain as in your production network... Ok, no problem! The switch is not connected, is just a stand alone switch used for training your future co-worker friend! But what happen if  he wants to check his email and for instance, connect the switch to the production network?! Well! This is where the danger lives! The Revision Number is much higher than 13, so your production switches will replace their database by this new one from the LAB Switch! And that can crash a network in just a few seconds!!!

Ok... so... am I not suppose to use VTP to avoid this kind of problem?! Well... if you have just a few VLANs yes... but if we´re talking about 100, or even 200, 300 vlans?! You´re going to add it manually in each switch in the network?! If you have 5 switches, you´ll have a LOT of work!

Some basic rules must be followed to avoid this kind of problem:

- Set the VTP Domain and also set the VTP Password;

- Have only ONE VTP Server in the network and made the changes just in it;

- When you add a new switch to a production network, reset the revision number (every time you change the VTP Domain name, the revision number gets reseted to 0);

- Only connect a new switch in the mode client (with the revision number reseted).

Taking care about it will make your life easier, and will help you to keep your job! :)

Will post some examples output later in the week...

Wednesday, May 14, 2008

Spanning-Tree (Sharing Traffic between Links)

Spanning-Tree help us to keep our networks loop free, and it does that without "almost" any kind of intervation. That´s so cool! You can just get your switch out of the box, install it, Spanning-Tree (at least on Cisco Switches) is enabled by default, so don´t worry about loops, you have other things in mind to be worried about (like IP Address, VLAN, VTP, etc).

By default Spanning-Tree will calculate the Best Path (that means the one with the lowest cost) to the Root, and if you have a second connection, with a higher cost to the root STP will block it! If it finds a tie between two paths, it´ll use other metrics (like first port, bridge id, etc).

Ok, but in your case, you have TWO Core Switches, with all the same features, working togheter. In that case (and many others) you can split your switch in two different VLANs (X and Y for example), and make your Core Switch 1 the ROOT Bridge for VLAN X, and Core Switch 2 the ROOT Bridge for VLAN Y. Check the diagram below (it´s simple):

STP7

That way you can use both links, instead of having ALL the traffic in only one, and having the other link blocked by Spanning-Tree.

How can you do that?! Just use the command spanning-tree vlan <vlan number> priority <priority value> at the root, just keep in mind that the lower the Bridge Priority, the best chances it has to become the ROOT Bridge for that VLAN.

The default priority value is 32768. If you configure your network for, let say, to 24576, it´ll become the ROOT Bridge. And you can do that for each VLAN (or group of VLANs).

In this example, Core Switch 1 would have this command line:

spanning-tree vlan 50 priority 24576

And Core Switch 2 with this one:

spanning-tree vlan 60 priority 24576

With that you can make a better use of your connections! (again, that will depend on your topology, planning is ALWAYS a MUST before doing any intervation in your network!).

We can also use Routed Access to do that (share traffic between links), in a smarter way, but that is a discusion for later! :)

Friday, March 28, 2008

IP Default-Gateway X IP Route 0.0.0.0 0.0.0.0

A common question of anybody configuring a Cisco Multilayer Switch (like 3560, 3750, and others), is the difference between the ip default-gateway and the ip route 0.0.0.0 0.0.0.0 commands.

Before starting, let´s talk a little bit about a Layer 2 Switch only... What is the purpose of an IP Address and Default-Gateway in a machine that speaks only L2 ?! Well... the answer is simple! Management! You assign an IP Address and Default-Gateway to a L2 Switch so you can access it, configure remotely, and so on! That is, the IP Configuration is setted ONLY for Management. It´ll not affect HOW the user traffic is handled or not! L2 will take care about that!

On the other hand in a Multilayer Switch, where you can run Layer 3, you can use IP ROUTE, or Routing Protocols to direct the user traffic to where you want it to go to. In this kind of Switch when you set the command ip route 0.0.0.0 0.0.0.0 <address> the destination address you just configured with this command will be used as a Gateway of last resort. That means, User Traffic and Management Traffic to destinations NOT LISTED in the Routing Table, will be directed to the Gateway of last resort.

When you set your switch to route with IP, you do not need to use the command ip default-gateway . Only when your switch act as a Layer 2 equipment only.

Wednesday, March 26, 2008

VTP Version

When configuring VTP, be carrefull to use the CORRECT VTP Version... You can check it using the command show vtp status it´ll show you the Supported Version (VTP Version) and the Configured Version (VTP V2 Mode).

If the VTP V2 Mode field = Enable than you´re running VTP Version 2.

Or... if the field VTP V2 Mode = Disable, you´re running VTP Version 1 mode.

Once again, do not confuse the VTP Version and the VTP V2 Mode fields, the first shows you which VTP Mode your switch is capable, and the second which VTP Version is actually configured.

See the example bellow:

switch#sh vtp status
VTP Version                     : 2
Configuration Revision          : 175
Maximum VLANs supported locally : 1005
Number of existing VLANs        : 71
VTP Operating Mode              : Client
VTP Domain Name                 : lab-02
VTP Pruning Mode                : Disabled
VTP V2 Mode                     : Enabled
VTP Traps Generation            : Disabled
MD5 digest                      : 0x42 0x9F 0x9A 0xF2 0x61 0x74 0x0A 0xAC
Configuration last modified by 13.191.31.230 at 1-25-08 22:34:22


It´s always good to "CLEAR" the VTP Configuration Revision number of your Switch before adding a new switch to the network.

The easist way to do that is to change the VTP Domain Name -vtp domain <new domain name> (example: vtp domain lab01) in the switch configuration, and then, changing it back to the original one. That will clear your configuration revision number. DO NOT FORGET to change the switch back to the desirable VTP Domain Name, and use the correct password if needed to have it working properly!

Also... set the switch mode to client - vtp mode client before attaching it to the network, so it learns "all" the VLANs from other operational switch, and then, if needed just change it to server - vtp mode server .